
CollectMax allows you to view and modify the images attached to Debtor or Client Accounts.
Select the image you would like to view from the image list.
Click on the ![]() button or double-click on the image name to be viewed. The
type of document will determine what program will open to view the image.
button or double-click on the image name to be viewed. The
type of document will determine what program will open to view the image.
For example, if the document is an imported Word document then Microsoft Word will be opened to view the document.
If the image is opened by the CollectMax Image Viewer, click on Image in order to Rotate, Flip, Sharpen, or Smooth your image. You can also adjust the Brightness and Contrast of your image here. Or Click Edit to Copy the image onto your clipboard.
Click the ![]() button in order to Print you image.
button in order to Print you image.
Select the image you would like to modify from the image list.
Click the  button. To change the double-click the image behavior to allow for image modification, see Imaging Options. Otherwise double-clicking on the image, will only allow you to view.
The file type will determine what default application will display the image. If the image is a bitmap, jpeg or tiff the CollectMax default viewer will be used to display the image. See Change Default Viewer for information on using an application other than CollectMax for viewing.
For Images such as Word or Word Perfect, the default application will open the image in Word or Word Perfect. Make modifications to the image and save within the application to make permanent changes to the images.
For PDF images, the complete version of Adobe Acrobat is require to make modifications.
For TIF, BMP, JPG and GIF images, only the image orientation and resolution can be modified using the CollectMax default viewer. The actual text of the image cannot be modified.
To change the orientation of the image, click on Image to Rotate, Flip, Sharpen, Smooth, Emboss and Resize your image. You can also adjust the image with other features here.
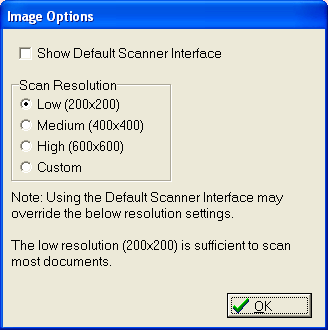
In order to change the Resolution of your scanned images, Click on Options and Scan Resolution. Here you can select a Low Resolution (200x200), Medium Resolution (400x400) or High Resolution (600x600). The system defaults to Low Resolution which is usually sufficient for most documents. Remember the higher the resolution, the larger your image files will be and thus they will take up more hard drive space. If one of the pre-defined resolutions are not satisfactory, you can define your own custom resolution setting by selecting the custom radio button and entering the width and height settings.
Once you have made your modifications, click on the disk icon to Save.
Note: Document images are not included in CollectMax Snapshots. JST recommends regular backups of your image directory as well as your